
Ceiling Insulation Perth is one of the most cost-effective ways to improve energy efficiency. It reduces heat loss during the winter and prevents excessive air flow in the summer.
It also mutes air noises and blocks external pollutants. This enhances indoor air quality and helps to sustain the environment.
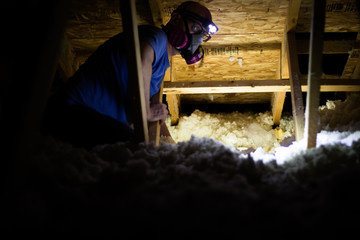
It’s recommended that you hire a professional to install your insulation. Poor installation can significantly reduce the effectiveness of insulation products.
1. Measure the Cavity
Before attempting to insulate your ceiling, it is important to measure the area and determine how much insulation you need. This will allow you to purchase the correct amount of insulation and save money in the long run. In addition, it will ensure that you are not purchasing too much insulation which can cause a number of problems such as blocking air flow and inhibiting ventilation.
In order to determine the level of insulation that is in your home, you will need a measuring tape and a calculator. In addition, it is a good idea to have a ladder or step stool available. This will help you get into areas that are not easily accessible and it will also make the job easier.
When measuring, it is important to take into account the thickness of the wall studs and any other structural elements that may be present in the area being measured. This will help you determine how much insulation is required to achieve the desired U-value. The U-factor is used to determine the insulating properties of a building and it is essential that the building is well-insulated in order to meet energy efficiency standards.
A professional should always be consulted to assess the requirements of the home and suggest the appropriate type of insulation for it. A good contractor will do this with the intent of fulfilling their client’s needs rather than meeting sales quotas. In addition, they will be able to offer advice about what types of insulation are best suited to your particular situation and will explain any potential pitfalls associated with different types of insulation.
In addition to reducing your energy bills, ceiling insulation is important in maintaining an optimal temperature and suppressing external noises. However, it is important to be aware of the fact that it can be possible to have too much insulation in a ceiling and this can cause a number of problems such as blocked air circulation, moisture build up and mildew.
A good option for your ceiling insulation is polyester, which has a number of advantages over other options. This includes being flame resistant, non-toxic and odourless. It is also heat bonded, which means that it won’t lose its thickness or insulating properties over time and it is also not affected by water, like other types of insulation.
2. Cut the Batts
Before you start to cut anything, turn off your power circuits at the main switch board to your house. It is not safe to be working in your roof space with the electricity still connected. It only takes one mistake and you could get electrocuted.
Also, you should wear a face mask and safety glasses as this insulation releases fine dust when it is cut. This is not harmful in the long term, but it can irritate those with breathing problems such as asthma. It is a good idea to work outside, but if you cannot do this, open nearby doors and windows before you begin to reduce the amount of dust in your home.
Firstly, make sure you have the right size batts for your roof. This is easy enough to check by measuring the gap between the joists, then using your meter to calculate the m2 area that needs to be insulated. You can then work out the number of packs you need to buy by dividing the m2 required by the coverage per pack. It is a good idea to buy a few extra packs just in case you need them, as there is nothing worse than being short of insulation half way through the job.
The majority of insulation available in Australia is in the form of either fiberglass or mineral wool batts. Both are excellent choices for insulating your ceiling, but there are some differences. If you are installing a cathedral ceiling, for example, it is often best to use foil-faced insulation to prevent moisture from condensing on the ceiling. This is especially important if you don’t have an attic to keep the moisture out of your home.
For other applications, you can choose between fiberglass or polyester ceiling batts. Both offer a high R-value and are very effective. Polyester ceiling batts are made from recycled plastic materials and are very cost-effective. They are pre-cut to fit most Australian ceilings and are ideal for DIY installers. In addition, they are non-itchy and do not release a fine dust like glass wool products.
3. Place the Batts
If installing new walls it is best to install insulation batts before the plaster goes up. This allows the batting to be fitted tightly between the studs and eliminates gaps that can reduce the R-value of your insulation. However, if this is not possible for your project you can always insulate the ceiling after the plaster has been installed.
Whether installing batt or rolled insulation, you need to take care not to compress the material too much as this can reduce its R-value. When working with fiberglass insulation it is a good idea to wear long sleeves, a hat and eye protection when cutting and handling the product. You should also always use a utility knife that has a fresh supply of sharp blades.
The first step in laying the insulation is to push it into the wall cavities, starting at the outside edges of the attic access panel and working toward the middle and attic hatch. In narrow stud bays, trim the batting to fit using a utility knife. Be careful not to block attic vents when doing this. Once the batting is in place it can be stapled up to the attic hatch using a pair of long staplers.
When working around electrical wiring or outlets you can use a three or four-inch putty knife to stuff the insulation behind them. When doing this be sure to remove any spliced or taped insulation that is no longer a sound barrier.
You should try to achieve a consistent level of batting throughout the ceiling. This will help to minimise air leakage, which can reduce R-values significantly. You should also ensure that the batting is not blocking the attic ventilation as this can cause moisture problems and damage your home.
Unfaced cellulose or polyester ceiling batts are an excellent choice for insulation in a new construction because they offer high thermal performance and a very low itch factor. These are available pre-cut to suit most Australian ceilings and are easy to handle. If your house is located in a noisy area, consider acoustic ceiling batts which will cut down on the transmission of airborne and impact noise.
4. Install the Batts
Insulation is one of the most important building components when it comes to controlling energy costs in new and existing homes. Whether the insulation is in the walls or ceiling, it helps reduce heat loss and gain, improves air quality and comfort, and saves money on utility bills. It’s important to install the proper amount of insulation and at the correct thickness (or R-value) for the climate zone you live in. And, to get the best results, a professional installation is always preferred.
If the wall insulation is in place, check for gaps or air leaks to prevent air and water infiltration that may result in mold and other costly problems. Then, caulk or expand foam should be applied to seal penetrations such as pipes and wires. This will also help to keep pests and rodents from gaining access to the insulation.
For new construction, install EcoBatt kraft, foil or FSK-foil batt insulation between the ceiling joists with the facing toward the conditioned space (in accordance with local codes and practices). The vapor retarder can be built into the material or the flanges can be stapled to the framing face and covered with an approved finish such as gypsum board.
When installing the insulation in the stud cavities, do not cram or force it into place. This will result in a less effective R-value. If the batts are unable to fit into the stud cavities, they should be sliced to better fit around obstructions such as electrical wiring or plumbing.
Be sure to properly trim the edge of the insulation to eliminate any sharp or uneven edges. Then, carefully cut the edge of each batt to match the inside face of the stud cavity before inserting it into place. For narrow stud bays, lay a 2×4 wood plank in front of the batting and line up one edge of the insulator with the inside face of the stud. Cut the batting along the edge of the 2×4 with a utility knife using several shallow cuts.
For ceiling insulation, push it into the stud cavities and then cut the edges of the batt to match the inside face of the ceiling joists. Do not crease or fold the insulation as this will result in gaps and air leaks.